Tuesday, June 27, 2017

Bathroom Trim

Well, here it is! Trim! I can't get over how much it has changed the presence of the window. And it is so pretty and white now! I know they say all white bathrooms are not in favor right now, but I love all the clean whiteness.

 I don't think I ever shared our latest window covering. I decided it was time to get something lighter then the picture frame we had propped in the window. After much thought and discussion, I finally decided a simple piece of fabric in the window was what we needed. After combing the fabric store for something to co-ordinate we finally settled on this black and white print (which is actually flannel, but who can tell?!). I ironed heavy weight interfacing (for extra stiffness and privacy) onto the back, hemmed up the edges and stuck Velcro in the corners to hold it in place. It has worked perfectly!

 Oh how I love the new window sill!! After looking at exposed framing for close to four years it is so nice to have clean painted wood.
I really was just hoping to get window sills here and in the kitchen this summer and possibly work on the rest of the trim this fall. But one thing led to another and before we knew it, it was an all out carpenter's shop for a week. Of course, replacing (and replicating) 1920's trim is not as simple as going to the home improvement store. We had to do it like it was originally done, custom made. Fortunately, my brother specializes in custom milled trim. He milled the baseboards out of 1 x 8 boards, the window sills were cut out of 5/4 x 4, the window trim was just standard 1 x 4 with a custom milled back bend (corner piece) out of 5/4 x 3. That is a lot of wood around the window!

It took Mandy and I a full Sunday plus mornings and evenings for three days to get is all installed. (Mitered corners are tricky!) It might not be the most professional job, but it is done! And we are rather proud we did it.


The baseboard doesn't have as much of an impact on the room as the window trim. Or maybe I should say the window trim out shines the baseboard? But it is lovely to have it finished off. Though I hadn't thought about the trim being 3/4" thick and sticking out more then we are use to around the tub (to the left in the above picture). I have already cracked my toes three times on it! This picture shows very well how snug everything fits in the bath. Cozy isn't it? 


Another picture showing just how cozy the bath is. The raw wood just behind the tub wall is the linen closet. I have thought long and hard over how to finish it off and finally come to the conclusion it is working just fine the way it is now and adding a curtain or door would just complicate things. And since you can't see the linen closet from the doorway, it doesn't glare out at us. I will just need to get a trim board and get it in and that should be done.

We also got the back bend on around the outside of the doorway and the baseboard on either side. I am so excited to have finally got this project done! There are a few more windows to restore and then, I think all the original projects will be done! Amazing!

Wednesday, June 21, 2017

Happy Summer!

 Happy Summer friends!
The summer busyness is in full swing around here, lots of comings and goings and lots of projects getting accomplished. We are still hard at work on the trim, but very close to having it done, we are on to the painting!

In the mean time, how about a garden tour in honor of the first day of summer?

We always have fun trying new combinations of annuals in our large flower pots. This year's choices are petunias, marigolds, dusty miller, snapdragons, alyssum and celosia.


 With all the warm weather in the last two weeks, they have really taken off! We are loving all the colors!

 The garden seems to have gotten a bit of a slow start, but is finally coming along nicely. The usual carrots, tomatoes, cucumbers, radishes, beans, lettuce and peas. Oh and dill that re-seeded from last year!

 Our one raspberry plant has gone a bit wild, it is the taller plant in the front of the box. Mandy is trying to decided what we are going to do about it, in the meantime, it looks like we will get a nice crop of raspberries!

The strawberries are going strong! A bit on the smaller side because of the warm weather, but oh so good.


I have been working on my "cutting garden". Trying to decide what to plant and what would be just enough. I was so excited the peonies bloomed this year, but missed the chance to pick any or get pictures.

 It is amazing how much all the bushes have grown! You can't quite see them, but there are two more hydrangeas behind the boxwood and they look like they will also bloom this year. I am so looking forward to it!

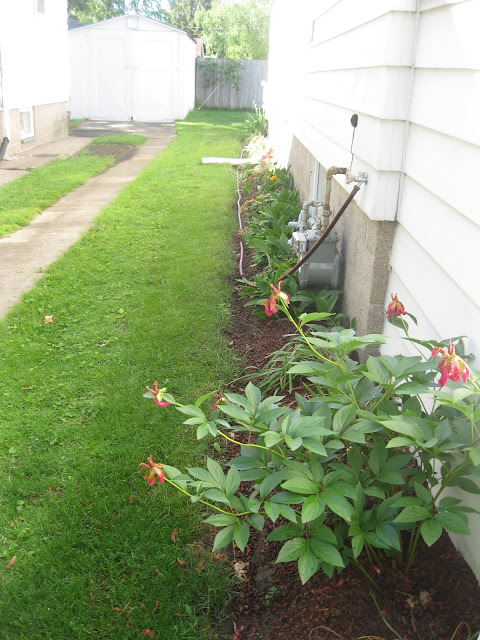
After last years renovations of the sidewalks and flower beds, I am finally happy with the way this side is shaping up. Because I took out the bit of a sidewalk that curved around the house, I was able to make the bed bigger. I think I might need another plant or two, but while I think on that the bleeding heart fills the space. The bleeding heart loves it here and I am not sure if I want to move/replace it. It does get a little wild, but because of the shade it stays green for most of the year.
Well, there you have it! That is what is growing at the little cottage.
How is your garden growing this year?

Tuesday, June 13, 2017

Happiness


Happiness is a pot of giant Zinnias!
(Planted along the side of the house in the cutting garden.)


A sneak peak at the current project underway! Yes, trim!!
It has been a few full fall-into-bed-already-half-asleep kind of days, but I am so so excited to finally get this project accomplished!

Tuesday, June 6, 2017

The Sewing Room Re-Do

I finally have pictures of the new bright and airy Sewing Closet! I am so excited with how it turned out, better then I imagined actually! There are a lot of the same things, but a lot is new.

 The biggest difference is a new sewing table! Getting a new table was a big decision for me as my brother had made my old one, but I am so glad I finally decided a change was needed. The old table was just taking up too much space and it wasn't being that useful. To be honest, it collected messiness like crazy!
So, I picked out a basic table from Ikea with just enough room for one sewing machine and the project I am working on. It makes the room look so much bigger!  My goal is to never never leave anything on the table after a project. I am going to try my hardest not to let the mess pile up!

 I don't know where the idea for little shelves came from, but one day it popped in my head! A very clear picture of white shelves lined with milk bottles, the sun from the window glinting off them. It took a bit of searching to find just the right shelves, but they are exactly what I pictured!

The back wall is the only blank unoccupied wall. At first I was going to fill it with a couple of pictures, but then I realized two things; the white wall makes a perfect backdrop to photograph finished items and I love seeing that white from my bedroom! I did put two hooks to hang newly finished makes, but when I want to admire the beautiful whiteness, I can just take down the hangers.

Another big change is my "closet" area. I had put up a small rod from the wall to the end of the shelving and it worked perfectly fine. But when Mom suggested putting an old fashioned coat rack there instead, I said, yes indeed!
I love how it has tidied up the corner. It works quite well for me as I only hang blouses and dresses. Most of my dresses (which I don't wear everyday) are in white muslin garment bags which also keeps it calming to the eye.


 On of my biggest worries was were to keep my shoes? I had them in a bin tucked under the hanging clothes, but with the coat rack, there is no place to hide them! Then I came up with the idea of muslin bags hung from the end of the shelving. Now they are tidily tucked out of the way and kept free of dust. (I love my basic white hooks! You can find then at any hardware or building store. They are liberally sprinkled about the house.)


This is the little wall to the left of the doorway, just large enough to fit my dresser full of patterns with all my sewing tools on top. Sorry, I didn't get a picture of the entire dresser. It is the same one that I have had though, Here it got a stencil makeover.

I love how this picture really show how big my sewing room is! I can never remember the dimension, though I know I have measured it. A twin bed should be able to fit under the window, so about six and a half feet by six and a half feet? It is amazing what one can do with a bit of space once you put your mind to it!


Now I am ready to sew! A good thing too as this little room feels like it is bursting with fabric!
Want to see what my sewing room looked like before? In 2014, With new wall art, Two months ago.

And this is my "happy" view from the bedroom!